-- How do I Assemble
my new SeaBright inflatable boat ?
For Boats up to 12.5 Footer

For 14 and 16 Footers
• Your boat has several main inflation valves. Air
can be inserted into these valves with the manual pump that
is supplied with the boat, with an electric pump, or with
a shop vac.
• Make sure the valves are in the “closed”
position before inflating the boat. They are “closed”
when the valve stem is up and “open” when it is
down. If you inflate your boat with the valves “open”
the air will rush out when you disconnect the hose. Valves
can be opened or closed by pushing on the stem and turning
it a quarter turn.
• If your boat is a RIB, simply
install your seats and oars and inflate the tubes to proper
pressure … Done !
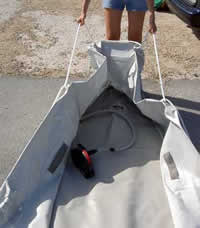
• Inflate all of the main chambers and the inflatable
keel (before floor insertion) and then open all of the valves
and let the boat deflate. Don’t push the tubes down
… just let the air escape normally. Make sure the inflatable
keel is nice and flat (not twisted) and that the valve is
in the middle. You may need to pat it down to accomplish this.
This procedure is especially important with a brand new boat
that has just come out of the box because the boat or inflatable
keel may be twisted which will make proper floor installation
difficult.
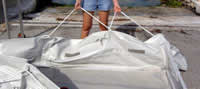
• Now the boat is in its correct shape to receive the
floor.
• If your boat is equipped with
an Aluminum Floor, install it as follows …..
o Notes:
o No air in tubes while installing floor and stringers.
o No air in inflatable keel while installing floor and stringers.
o Warm environment is easier because the PVC will not be
as stiff
o Boats up
to 12.5 feet in length (SeaBright 380P)
o Install piece number "1" into the nose of the
boat (number up). Make sure that you push it as far forward
as possible and that it is down below the tubes.
o Install piece number "1" into the nose of the
boat (number up). Make sure that you push it as far forward
as possible and that it is down below the tubes.
o Install the rear most piece, making sure it is down below
the tubes and the rear edge is under the wooden “hold
down” strips that are attached to the transom.
o Now keep installing pieces to the front and the rear
until you meet approximately in the middle of the boat.
o In order to get the last tongue into the last groove
you will need to pull them both up about 10 inches. Fit
them together so that you have a raised “tent”
and then push them both down so that the floor is flat.
Although this is possible with one person it is much easier
with 2 people …. One on each side of the boat. As
you are pushing these last 2 pieces down make sure you are
not “pinching” the tubes and that the valve
covers are not trapped beneath the floor.
o At this point use your fingers to make sure the gap between
the tubes and the edge of the aluminum floor is the same
on both sides. If it isn't then it will be difficult to
install the stringers properly.
o Install the stringers onto each side of the floor. They
need to be installed so that they overlap the joints of
the aluminum floor pieces. This is what will provide stability.
If there are 4 stringers with your boat then you need 2
on each side and there should not be any gap between them.
Only the aluminum pieces need support …. Not the wooden
floor piece(s).
o Stringer installation requires that the boat is on a
flat surface. If the surface is not flat or if you are having
difficulty installing the stringers it may help to put a
2 x 4 under the edge of the floor (on its edge). Do one
side at a time. This will flatten the floor on that side
and will also let the tube “fall away” slightly
which will result in a slightly larger gap and easier stringer
installation.
o Take a wet towel and “wet down” the tube
and the stringer. This will decrease friction. Now install
the stringer be “curling” it in. Large flat
side needs to be down.
o HD Boats (SeaBright
420P and SeaBright 500P)
o Unpack the boat and unroll it on a flat surface.
o Inflate all four chambers before installing the floor.
Inflate the inflatable keel. Now open all five valves by
depressing and twisting a quarter turn (4 main Chambers
and the keel) and let the boat deflate. Pat down the inflatable
keel so that it is nice and straight and not twisted. Now
the boat is ready for the floor.
o Take a bucket of water and pour into the boat making
sure the entire hull skin is wet (or use a garden hose).
o Install the front three floor pieces. Install the rear
3 floor pieces. Make sure that these six pieces are all
below the tubes and in their proper position.
o Now install the middle piece. You will need to tent up
two pieces. Now get inside the boat press down make the
floor flat. This is much easier with two people because
if you are not careful at this stage you can pinch the PVC
fabric. As one person watches the edges for pinching the
second person should stand on the tent and bounce up and
down. The tent will slowly go down until floor is flat.
o Now it is time to install the stringers.
o While one person holds up one side of the boat by pulling
up on the ropes place an 8 foot 2 by 4 under the boat. It
should be on its edge and should be about three or four
inches inside the aluminum floor. This will result in the
tubes falling slightly away and the gap where the stringers
need to go will get a bit larger.
o There are four stringers. Two are short and two are long.
Each side of the boat needs a short and a long stringer.
Stringers are designed to hold the floor rigid while going
over waves and it is important that each aluminum floor
joint is supported by at least 10 inches on each side. Before
installing stringers place them on the floor and decide
where you want them.
o Get inside the boat. Then use water to wet down PVC tube
where the Stringer will be installed and also the stringer
itself.
o It is very important that the panels onto which you are
installing a Stringer are completely flat with each other.
The person inside the boat should use his weight to make
sure the 2 panels (or 3) that are receiving the stringer
are all flat.
o While the person outside of the boat pulls of the tube
away to make a the gap larger, the person inside the boat
curls a Stringer into place.
o Now do the same with the second Stringer on that side.
o Remove the 2 by 4 and a place under the boat on the other
side. Follow the steps above to install the two stringers
on that side.
• If your boat is equipped with
a High Pressure Airdeck Floor, install it as follows …..
o Place the deflated airdeck floor in the boat with the
floorboard underneath. The floorboard is in a sleeve and
its primary purpose is to keep the floor flat when the keel
is inflated. The easiest way to install the airdeck is to
press the floorboard down under the 2 tubes at the very
rear of the boat because this is where the boat is the widest.
Now get into the boat and gently pull the floor forward
making sure that the keel board stays securely under the
2 tubes. Do not apply great force. If the floor will not
move forward then inspect it to see where the "bind"
is. After you install the floor 2 or 3 times it will be
easy. When you can see the inflatable keel valve through
the "hole" at the front of the floor then you
have pulled it forward far enough. The rear of the floor
should now be almost touching the transom. Now walk around
the boat tucking the floor down underneath the tubes.
o It is time to inflate your airdeck floor. You want the
floor to be hard enough so that you can walk on it without
sinking in very much. Don’t be afraid to put lots
of air into it. A good indication that it is inflated properly
is when it becomes difficult to push down on the plunger
handle of your pump.
• If you want the seats installed, install them now.
*Note* It is not necessary to install the seats if you prefer
to run without them.
• Now you can inflate the main tubes. They should be
fairly hard to the touch, and you should be able to sit on
them without sinking into them more than an inch. **NOTE**
Inflate the main compartments in a 2 or 3 step sequence. If
you fully inflate one main compartment when the others are
empty you may damage the internal bulkheads that separate
the compartments.
• Finally it is time to inflate the keel. The valve
should be clearly visible and should be pretty much in the
middle of the hole in the front of the floor. The boat will
rise as you inflate the keel. The keel should be harder than
the tubes. A good indication that it is hard enough will be
when the pump handle is beginning to be difficult to push
down.
• Install the oars, put in the valve protectors, and
you are ready for a day on the water. Enjoy!
****Assembly Notes****
• The valves should be in their "closed"
position prior to inflation. They are closed when they are
popped up. If you push the valve down and give it a quarter
turn it will stay down in the "open" position. Do
this when you wish to deflate the boat. If you inflate the
boat with the valve in the "open" position the air
will rapidly escape as soon as you remove the pump.
• It is not recommended that you use a compressor to
pump up your boat. Compressors are designed for very high
pressures and you could easily damage the boat.
• If you have access to electricity one of the easiest
and quickest ways to inflate (or deflate) your boat is with
a "shop vac". Give it a try. It really works great.
You will need to have the valve down in the "open"
position to use a shop vac. Be ready to very quickly pop the
valve back up into the "closed" position when you
pull the shop vac nozzle away to prevent the air from escaping.
• If your boat isn’t “planing” properly
or seems to be too “flexible” when under power
it is probably under inflated. If your boat is equipped with
a High Pressure Airdeck Floor and/or an inflatable keel, they
should be fairly hard, and the tubes should be hard enough
that you can sit on them without depressing them more than
an inch..
• If your boat is equipped with an Aluminum Floor,
It is highly advisable to assemble your aluminum sectional
floor for the first time outside the boat in order to learn
how it all goes together. After you are familiar with how
the floor pieces and stringers all fit together it will be
much easier to assemble it properly when doing it inside the
boat.
Recommended Pressures:
Main Tubes: .........................................
3.5 psi
Inflatable Keel: ....................................
6 psi
High Pressure Airdeck Floor: ........... 8 psi
What is the Black
Valve ?
The black valve that is located in the front chamber (2 front
chambers in the SeaBright 420P and the SeaBright 500P) is
a high pressure safety release valve that will release some
air if the boat becomes over pressurized, thereby ensuring
that the seams do not get damaged. It is automatic and there
is nothing you need to do to this valve.
What if a Valve is
Leaking ?
You may notice that after a day or 2 your new boat will have
1 or more chambers that have gone a bit soft.
This almost always because the inflation valve (or the black
high pressure safety release valve) was not screwed in tightly
enough when the boat was assembled.
To test the valve simply put a bit of soapy water on the
valve. If bubbles are forming around the outside edge of the
valve then it needs to be tightened. It is sometimes easier
to put the boat up on its side so you can apply the soapy
water directly down onto the valve.
In your orange Repair Kit you will find a black plastic valve
wrench that is used to tighten the valve by turning it a bit
clockwise. Turn until bubbles stop forming. Please note that
this tool is only plastic and can break if too much pressure
is applied.
If it is the black high pressure safety release valve that
is leaking around the outside edge you will need to use a
pair of adjustable pliers to carefully grab the edge and turn
clockwise.
Note: If bubbles are coming from the middle
of the valve (not around the outside edge) then it is a different
issue and you will need to call us to discuss the solution.
Note: It is completely normal for any inflatable
boat to lose some pressure over a period of time. If you notice
this happening over several weeks or months (or over the Winter)
please simply add some air.
============================================================
|